How to Take Blinds Down Without Damaging Your Windows

Blinds give your home privacy, shade, and style. But sometimes, you need to take them down maybe for a deep clean, to swap them for new ones, or to repair worn parts. Knowing how to take blinds down saves time, prevents damage, and helps you keep your home looking sharp. This guide explains the process step by step, using clear language so anyone can follow. From horizontal blinds to cordless designs, you’ll learn simple methods, safety tips, and tricks for handling different styles.

Understanding Why Homeowners Remove Window Blinds

Blinds don’t last forever, and there are many reasons people decide to remove them. Dust builds up over time, making blinds look dull and unhealthy for people with allergies. Pets or kids may bend slats, chew cords, or loosen brackets. Styles also change what looked good a decade ago may now clash with your décor. Some homeowners remove blinds only to wash them properly, while others take them down before painting or remodeling. By learning the right removal steps, you avoid scratching your windows, breaking brackets, or bending slats. Taking blinds down is a small skill that pays off again and again.

Preparing Before You Start: Tools and Safety Tips

Preparation makes the job easier. Before starting, gather what you need:

  • Flathead screwdriver or drill (for loosening brackets).
  • Gloves (to protect your hands from dust or sharp edges).
  • Step stool or ladder (if blinds are high).
  • Sheet or towel (to catch falling dust or screws).

Always inspect your blinds before beginning. Are they held by clips, screws, or spring brackets? Cordless blinds and top down bottom up designs may have hidden tabs. Knowing this first prevents mistakes later. Work in daylight or with good lighting so you can clearly see what you’re doing. If blinds are heavy like wooden or wide faux wood designs—ask someone to help. Small details, like turning off ceiling fans and keeping pets away, can make the process smoother and safer.

How to Take Blinds Down Safely Without Damage

The goal is not only to remove blinds but to keep them in good condition. Follow these steps:

  1. Raise the blinds fully. This stacks the slats at the top, reducing weight and making them easier to handle.
  2. Check the brackets. Most blinds have two brackets at the top corners. Some have locking tabs or flaps, while others use clips.
  3. Release the headrail. Use your finger or screwdriver to press the tab or lift the flap. Always support the blinds with your free hand.
  4. Slide the blinds forward. Once the headrail is loose, gently slide it out of the brackets.
  5. Lower carefully. Place the blinds on a flat surface like a blanket to prevent scratches.

Avoid pulling hard or twisting the blinds while removing them. This could bend the rail or crack plastic parts. Taking your time helps you avoid accidents and keeps the blinds reusable.

Step-by-Step Guide: How to Remove Window Blinds from Brackets

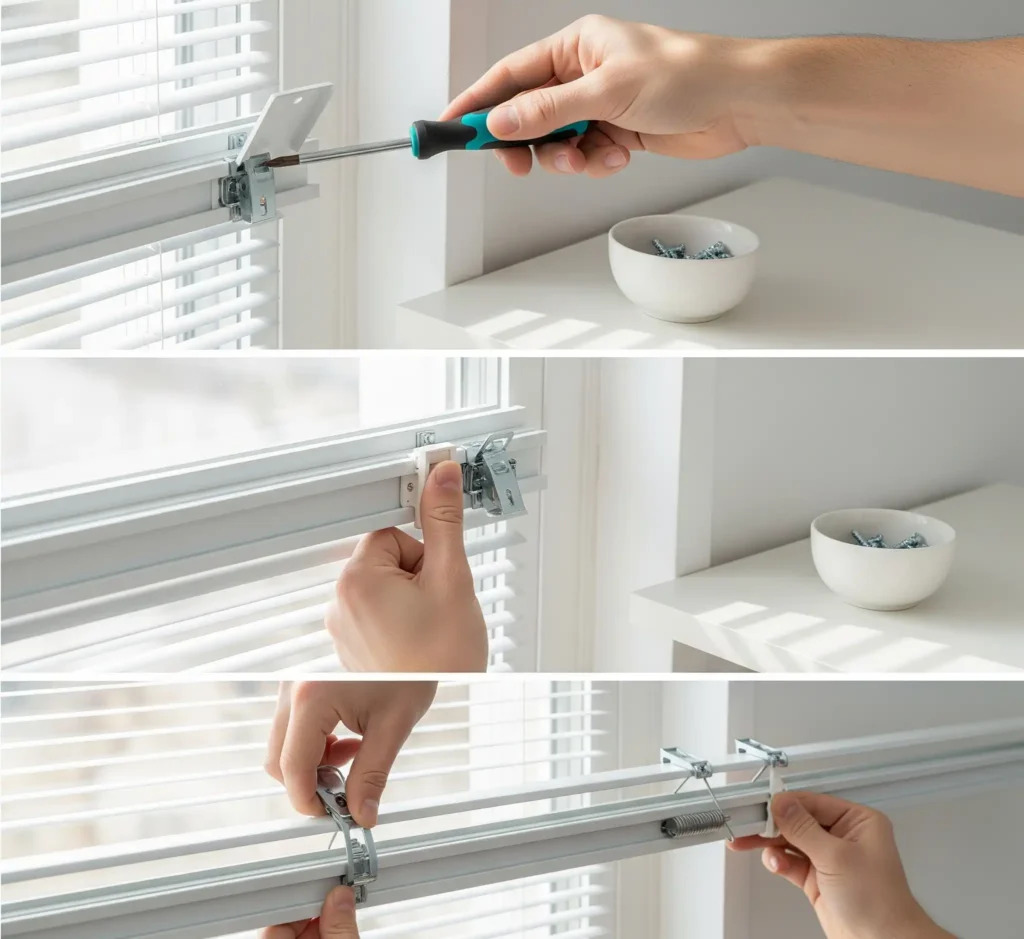
Every blind has a headrail fixed to the wall or frame using brackets. Removing these correctly is the key to success. Here’s how:

  • Open-face brackets: These have a front flap that swings open. Use your screwdriver to lift the flap, then pull the headrail forward.
  • Clip-on brackets: Press the small clip with your thumb or tool. Once the pressure releases, the headrail slides out smoothly.
  • Spring-loaded brackets: Hold the headrail firmly with two hands. Pull gently forward until the spring gives way, then remove the rail.

Keep screws, clips, or small parts in a small bowl or bag. This ensures you don’t lose them if you plan to reinstall later. If you’re removing blinds for cleaning, label which brackets belong to which window this saves confusion when putting them back. For tall windows, always use both hands and avoid leaning too far from a ladder. Safety first makes the process stress-free.

Taking Down Horizontal Blinds and Mini Blinds Correctly

Horizontal blinds and mini blinds are among the most common window coverings in homes. Removing them is straightforward once you know how the brackets work. Start by pulling the slats all the way to the top. This makes the blind compact and lighter to handle. Mini blinds usually connect to small spring-loaded brackets. Push back the spring tab using your thumb or a flathead screwdriver.

Once the pressure releases, gently slide the headrail forward. Horizontal blinds, which are often wider, may use latches instead of spring tabs. Flip the latch open, hold the headrail with both hands, and lift it out. Always support the blinds when releasing them to avoid sudden drops. Handling them gently helps you keep both the blinds and the wall safe from scratches.

How to Remove Faux Wood, Vinyl, and Wooden Blinds

Blinds made from different materials need slightly different care. Faux wood blinds are heavy, so having another person nearby is helpful. Once you’ve released the brackets, lift both ends evenly to prevent the headrail from bending. Vinyl blinds are lighter and flexible, but the slats can crease if you squeeze them too hard. Handle them softly and place them on a flat surface after removal. Wooden blinds, while strong, can chip or crack at the edges if not supported correctly. Remove them slowly and place them on a towel or blanket to protect the finish. Taking these small precautions ensures the blinds stay in good condition, whether you’re cleaning or reinstalling them later.

Tips for Removing Cordless and Top Down Bottom Up Blinds

Cordless blinds operate differently because they use spring-loaded tension instead of cords. To remove them, first push the slats all the way up. Locate the brackets on each side and check for small release buttons or levers. Press these gently while holding the headrail steady. Slide the blinds forward until free.

With top down bottom up blinds, you’ll often see extra cords or clips at the top. Disconnect these carefully before removing the headrail. Because these blinds have more moving parts, it’s easy to damage them if you rush. Always use steady, even pressure when loosening the brackets. If you feel resistance, pause and double-check for hidden screws or clips. A careful approach saves both time and money by keeping the blinds intact.

How to Take Down Blinds with Clips and Special Mounts

Some blinds especially venetian, pleated, or custom designs use clips or specialty mounts instead of standard brackets. These clips can be small and tricky to spot. Look closely at where the headrail meets the window frame. If you see slim metal or plastic clips, press outward on them with your thumb or a screwdriver.

At the same time, gently pull the headrail forward. Work one side at a time until both ends are free. For blinds with decorative mounts, check if the covers hide small screws. Remove these before trying to slide the blinds out. If clips feel tight, avoid using force, which can crack the plastic. Instead, apply slow, steady pressure until they release. Having patience with clip systems prevents unnecessary damage and makes reinstalling easier later.

Cleaning Made Easy: Removing Blinds for Washing or Dusting

Blinds gather dust and dirt fast, especially in kitchens and living rooms. That’s why many people prefer to take them down before cleaning. Once removed, place vinyl or aluminum blinds in a bathtub with warm soapy water. Let them soak, then wipe with a sponge. Faux wood or wooden blinds should not be soaked, since water can cause warping. Instead, wipe each slat with a damp cloth and dry immediately. Always let blinds dry fully before reinstalling, to avoid mildew or damage. Cleaning blinds after taking them down is not only easier but also more thorough, leaving your windows fresh and bright.

When to Replace Old Blinds Instead of Reinstalling

Sometimes blinds are too worn to put back. If cords are frayed, slats are broken, or mechanisms are stiff, replacing might be smarter. Old blinds may also look outdated and no longer match your home style. Removing them gives you the chance to upgrade to modern options, such as cordless blinds or motorized shades. During removal, inspect the brackets too. If they are rusted or cracked, it’s safer to start fresh with new hardware. CV Floors & Blinds often advises customers to replace blinds if they no longer function smoothly. A new set not only improves the room’s look but also adds comfort and safety.

Local Help with Window Blinds Removal in Coachella, CA

While many blinds are simple to remove, others can be challenging especially large wooden blinds or blinds mounted high above the floor. If you don’t feel comfortable, it’s wise to call professionals. In Coachella, CA, CV Floors & Blinds provides expert help for blind removal, cleaning, and replacement. Our team has years of experience handling everything from mini blinds to faux wood and venetian blinds. We work carefully to protect your walls and windows while ensuring your blinds come down safely. Local service means you get trusted care and peace of mind when handling your window treatments.

Conclusion

Learning how to take blinds down gives you confidence to care for your home. With the right tools, careful handling, and patience, anyone can manage this task. From mini blinds to cordless and venetian designs, the process becomes easy once you understand brackets and clips. Some blinds are worth reinstalling after cleaning, while others may be better replaced with newer options. Either way, removing blinds is a helpful skill that saves money and keeps your home looking neat.

Looking to remove, clean, or replace blinds with ease? Reach out to CV Floors & Blinds for expert guidance and service. Our team makes the process stress-free so your home always looks its best.

Related Post

How to Clean Faux Wood Blinds Simple Tips for a Fresh Look

How to Clean Faux Wood Blinds: Simple Tips for a Fresh Look

Faux wood blinds are an affordable and stylish window treatment option for homes and offices. They look great, are easy to maintain, and offer the same aesthetic appeal as traditional wood blinds but at a lower cost. However, like any other window covering, faux wood blinds require regular cleaning to keep them looking fresh and to extend their lifespan. In this blog, we will guide you through the process of how to clean faux wood blinds effectively. Why Faux Wood Blinds Are Popular in Coachella, CA Homes Faux wood blinds have become a popular choice for many homeowners in Coachella, CA, and for good reason. These blinds offer the look and feel of real wood but are made from durable materials that are resistant to moisture and wear. They are especially beneficial for areas with high heat and humidity, like Coachella, where traditional wooden blinds may warp or fade. Faux wood blinds are easy to clean, making them a great option for homeowners looking for minimal maintenance with maximum style. At CV Floors and Blinds, we pride ourselves on providing high-quality faux wood blinds to homes in the Coachella area. Whether you’re renovating your space or installing new blinds, we have the perfect options to match your style and needs. The Best Way to Clean Faux Wood Blinds Without Damaging Them When it comes to cleaning faux wood blinds, it’s essential to take the proper steps to avoid causing damage. Using the wrong cleaning methods can lead to scratches, discoloration, or even the warping of the material. The best way to clean faux wood blinds is with a gentle touch. Here are the key steps you can follow: By following these simple steps, you can ensure that your faux wood blinds remain in excellent condition for years to come. How Do You Clean Faux Wood Blinds: The Essential Tools You’ll Need To clean faux wood blinds properly, it’s important to have the right tools at hand. You don’t need fancy gadgets, just a few everyday items will do the trick. Here’s a list of essential tools you’ll need: Having these tools ready will make the cleaning process smooth and efficient. Washing Faux Wood Blinds: A Simple Process for Perfect Results While faux wood blinds are easy to clean, there are times when they may need a more thorough cleaning, especially if there’s grime or built-up residue. Washing faux wood blinds requires a bit more effort, but the process is still relatively simple: This method works well for heavily soiled blinds but should be done occasionally to avoid excess moisture exposure. How to Clean Faux Wooden Blinds Effectively Without Harsh Chemicals If you’re concerned about using harsh chemicals on your faux wood blinds, rest assured that there are plenty of natural alternatives that can clean effectively. Here’s how you can clean faux wood blinds without resorting to harsh chemicals: These natural cleaning solutions are not only safe but also effective in cleaning your faux wood blinds. How to Clean Faux Wood Blinds That Have Yellowed or Discolored Over time, faux wood blinds may develop a yellowish tint, especially if they are exposed to sunlight or smoke. To restore the original color, follow these tips: After applying these solutions, wipe the blinds with a clean, damp cloth and dry them with a towel. Common Mistakes When Cleaning Faux Wood Blinds and How to Avoid Them Many homeowners make common mistakes when cleaning faux wood blinds. These mistakes can lead to damage or ineffective cleaning. Here are a few common errors to avoid: By avoiding these common mistakes, you can keep your faux wood blinds looking pristine. How to Clean 2-Inch Faux Wood Blinds with Precision Cleaning 2-inch faux wood blinds requires a bit more attention to detail. Here’s how you can clean them effectively: Cleaning 2-inch faux wood blinds is very similar to cleaning standard blinds, but it requires more care due to their size. The Top Benefits of Cleaning Your Faux Wood Blinds Regularly Regularly cleaning your faux wood blinds has several benefits: By keeping your blinds clean, you are ensuring that they remain a long-lasting, functional, and attractive part of your home decor. Why Choose CV Floors and Blinds for Your Faux Wood Blinds Needs in Coachella, CA At CV Floors and Blinds, we understand the importance of having quality window treatments that are both stylish and durable. We provide premium faux wood blinds that are easy to clean and maintain. If you’re in the Coachella, CA area, we’re here to help you choose the perfect blinds for your home or office. Whether you’re looking to install new faux wood blinds or need advice on cleaning them, our team at CV Floors and Blinds is dedicated to offering top-notch products and services. Contact us today to learn more!

Read More »
How Much Do Plantation Shutters Cost in Coachella

How Much Do Plantation Shutters Cost in Coachella?

If you’re considering adding a stylish and functional window treatment to your home, plantation shutters are an excellent choice. Known for their timeless beauty and durability, plantation shutters provide both privacy and control over the amount of light entering a room. But how much do plantation shutters cost? In this article, we’ll answer that question and explore the factors that influence the cost of plantation shutters. We’ll also discuss why plantation shutters are worth the investment and how you can get an estimate for your Coachella, CA home. Why Choose Plantation Shutters for Your Home? Plantation shutters are a popular choice for homeowners looking to enhance the beauty and functionality of their windows. These shutters are versatile, easy to maintain, and offer a range of benefits. One of the main reasons people opt for plantation shutters is their ability to control light and privacy. The adjustable louvers allow you to regulate the amount of sunlight that enters the room, helping to create the perfect ambiance for any time of day. They are also more durable than traditional blinds and curtains, offering long-term value. Additionally, plantation shutters add a timeless, elegant look to any room. They are available in various materials, including wood, vinyl, and composite, allowing you to choose the best option for your style and budget. Plus, plantation shutters can increase the value of your home, making them a worthwhile investment. Cost of Plantation Shutters in Coachella, CA The cost of plantation shutters can vary based on several factors, including the size of the windows, the material chosen, and the complexity of the installation. In Coachella, CA, the cost of plantation shutters typically ranges from $200 to $500 per window, with higher-end materials and custom designs pushing the price up even further. For instance, a standard set of plantation shutters for a medium-sized window could cost around $300 to $400, including both the shutters and installation. However, larger windows or specialty designs such as shutters for sliding glass doors may come with a higher price tag. It’s important to note that the cost of plantation shutters also depends on whether you choose a more affordable material like vinyl or a premium option like wood. Understanding the Average Cost of Window Shutters When shopping for window shutters, it’s helpful to understand the average cost per window. On average, window shutters typically range from $400 to $800 per window. The lower end of the spectrum is usually for standard vinyl shutters, while higher-end materials like wood or composite can cost more. The cost can also depend on the type of shutters you choose. For example, plantation shutters are typically more expensive than basic roller or Venetian blinds due to their design, durability, and ability to add value to your home. Keep in mind that custom or oversized windows will likely incur higher costs due to the specialized materials and measurements required. Are Plantation Shutters Expensive? Breaking Down the Costs Plantation shutters are often seen as a more expensive window treatment option compared to traditional blinds or curtains. However, they offer long-term value that makes them a worthwhile investment. While the initial cost may be higher, plantation shutters are durable, easy to maintain, and can last for many years with proper care. The cost of plantation shutters is influenced by several factors, including the size of your windows, the material you choose, and the complexity of the installation. For example, wood plantation shutters are generally more expensive than vinyl options due to the material’s natural beauty and durability. However, many homeowners find that the investment is worth it, as plantation shutters can add significant value to your home. Indoor Window Shutters Cost: A Detailed Breakdown Indoor window shutters are available in a range of materials, each with its own price point. Vinyl shutters tend to be the most affordable option, with prices ranging from $200 to $350 per window. Composite shutters, which combine wood and synthetic materials, typically cost between $300 and $450 per window. Wood plantation shutters are the most expensive option, with prices ranging from $400 to $500 or more per window. The cost of indoor window shutters also depends on the size of the windows and whether they are standard or custom-sized. Custom-made shutters for large windows or unique shapes will typically cost more than off-the-shelf options. Wood Plantation Shutters: Are They Worth the Price? Wood plantation shutters are often considered the gold standard for their beauty and durability. These shutters offer a classic, timeless look that adds elegance to any room. They are also highly customizable, allowing you to choose from various wood types, finishes, and colors to match your home’s decor. However, wood plantation shutters are more expensive than other materials, with prices typically ranging from $400 to $500 or more per window. While they may come with a higher initial cost, many homeowners find that the investment is worth it due to the shutters’ long lifespan, superior insulation properties, and the added value they bring to their home. Factors That Affect Plantation Shutter Installation Costs Several factors can impact the cost of plantation shutter installation. Window Size: Installation Complexity: Material Choice: How Much Does Shutter Installation Cost in Coachella? In Coachella, CA, the cost of shutter installation typically ranges from $100 to $300 per window. This price includes both the labor and materials required to install your plantation shutters. However, the cost can vary based on factors such as the size of the windows, the material chosen, and the complexity of the installation. For example, installation of wood plantation shutters may cost more than vinyl shutters due to the additional time and care required for the installation process. Additionally, custom window installations may cost more due to the specialized measurements and adjustments needed. What is a Plantation Shutter Estimate and Why Do You Need One? A plantation shutter estimate is an important tool that helps you understand the overall cost of purchasing and installing plantation shutters in your home. It typically includes the cost of

Read More »
Exterior window shade ideas

Exterior Window Shade Ideas That Improve Light and Heat Control

Exterior window shade ideas are smart ways to block strong sunlight, reduce heat, and protect your home while also improving how it looks from the outside. The best options include outdoor roller shades, solar screens, awnings, shutters, and exterior panels that stop heat before it enters your windows. Exterior window shade ideas work best because they block the sun outside the glass, which keeps rooms cooler and lowers glare. They also help protect furniture, add privacy, and give your home a clean and finished look. Why Homeowners Look for Fresh Ways to Control Sunlight and Heat Many homes get too much sunlight during certain hours of the day. When sunlight hits the windows directly, the rooms warm up quickly, and this creates discomfort. Kids may find it hard to study, families may feel overheated, and daily tasks become harder. Sun glare also makes it difficult to use screens, televisions, or computers. Most people start by trying blinds or curtains inside the house. These help a little but do not fix the main problem. Once sunlight reaches the glass and passes through, the heat enters the room and becomes trapped. This is why indoor solutions often feel too weak on very hot days. Over time, families notice that floors, furniture, and fabrics start to fade due to strong UV rays. They also notice how their energy bills climb because the air conditioner runs more than usual. These issues make many homeowners look for better outdoor shading methods. When sunlight is blocked outside the window instead of inside, the home stays cooler naturally and feels more balanced. How Exterior Window Shade Ideas Improve Comfort and Upgrade Curb Appeal Exterior window shade ideas improve comfort by stopping heat before it reaches the inside of the home. This removes a large amount of the heat that normally enters through the windows. Rooms feel cooler, and the temperature stays more stable throughout the day. Glare is reduced as well. When bright light reflects off screens, it causes eye strain and makes it difficult to focus. Exterior shading helps soften that light while still allowing natural brightness to enter safely. This makes daily activities, reading, and relaxing easier. These ideas also upgrade curb appeal. A home with well chosen exterior shading looks cared for and stylish. The shades can add contrast, texture, and personality. They create depth around the windows, and the home looks more complete and intentional. New buyers often look at window shading as a sign of good home maintenance. Understanding Outdoor Window Covering Ideas for Modern Homes Outdoor window coverings come in many shapes and styles. Some are designed to stay in place all year. Others move up and down or open and close depending on sunlight. The purpose of all of them is to control heat, block glare, add privacy, and protect windows from harsh weather. Materials used for outdoor coverings must be stronger than indoor fabrics. They are often made from weather resistant vinyl, aluminum, outdoor mesh, and treated fabrics. These materials hold up against wind, sun, rain, and dust. Modern homes often choose shade options with simple and clean lines. This trend matches many home designs today. The goal is to add comfort without overpowering the home’s natural style. Neutral colors are also very popular because they blend well with most exteriors. Outdoor coverings benefit older homes as well. They hide worn or faded window frames and add newer details that make the home look updated. Popular Exterior Window Treatments That Offer Style and Practical Shade There are many popular exterior window treatments that offer strong shade and also look attractive. Outdoor roller shades are a favorite choice because they roll down when needed and store neatly when not in use. These shades help block UV rays and heat while still letting some natural light pass through. Solar screens also provide strong sun protection. They reduce heat and glare but still allow you to see outside. Many homeowners like using them on large windows because they create a cooler environment without making the home feel dark. Awnings are another well loved option. They extend from above the window and give shade from the top down. Some awnings are fixed in place, while others can be retracted. These are great for windows that receive direct sunlight during the afternoon when heat is highest. Exterior shutters add both beauty and function. They provide shade, block light when needed, and protect windows from strong weather. Shutters come in many styles, from classic to modern, making it easy to match the home’s look. Creative Outdoor Window Shade Ideas for Better Sun Control Creative ideas make exterior shading more interesting and more effective. Layering shade types is one approach. For example, combining a solar screen with a soft awning gives extra protection without blocking all light. This layered style also creates a more decorative look. Sliding exterior panels are another creative option. These panels move side to side and allow homeowners to adjust them based on the sun’s direction. This is helpful when different windows receive sunlight at different times of the day. Outdoor fabric shades add warmth and softness to a home’s exterior. These shades use strong outdoor fabric and bring a refreshing, relaxed feel to windows. They are great for patios, large windows, or areas where you want both shade and style. Decorative trim and color matching also make shading more personalized. Homeowners can choose colors that match shutters, trim, or roofing. These small choices make outdoor shading blend in smoothly. How to Shade a Window From the Sun With Simple and Low Maintenance Options Shading a window does not need to be difficult. Some of the easiest solutions require minimal care. Fixed exterior screens are one example. These screens stay in place permanently and require very little cleaning. They filter sunlight throughout the day without needing adjustments. Roll down shades are easy to use as well. You can lower them quickly on hot days and lift them when the sun is

Read More »
Table of Contents