How to Cover a Curved Window: Blinds, Curtains & More

Curved windows are a stunning feature in any home, but covering them can be tricky. Whether you have half-circle, arched, or fan-shaped windows, the options for covering them are diverse. From DIY solutions to professional installations, the right window treatment can balance light, privacy, and style. This article provides in-depth insights into various ways to cover curved windows, from using curtains and blinds to more unique solutions tailored to the shape of your windows.

Understanding the Beauty and Challenge of Curved Windows

Curved windows bring beauty and uniqueness to any room. Whether they are arched windows, half moon windows, or fan-shaped windows, they add a distinct architectural style. However, this charm comes with its challenges. Unlike square or rectangular windows, curved windows don’t always fit traditional blinds, shades, or curtains, making them tricky to cover while maintaining their visual appeal. Curved windows need special attention, which is why finding the right coverings for them requires thoughtful consideration. They often require customized solutions to balance light control, privacy, and aesthetics.

When covering a curved window, the goal is not just to block the light but to maintain the integrity of the window’s design. Too often, homeowners may choose standard window coverings, only to find they don’t fit properly or fail to complement the window’s shape. Understanding the challenges can help you make the right choice for your window treatment.

Why Covering Unique Window Shapes Requires Special Solutions

Unlike typical flat windows, curved or arched windows require coverings that can fit their irregular shape. While curtains, blinds, and shades work well for standard rectangular windows, curved windows need a more creative approach. Standard window treatments like mini-blinds or roman shades may not follow the curvature of the window, leaving gaps or making the window look awkwardly covered.

Choosing the right solution starts with understanding the window’s dimensions and curvature. For example, a half-circle window will require different treatments than a fan-shaped or eyebrow arch window. Some curved windows, especially larger ones, might also need custom-designed treatments that are tailored to their specific curves. In these cases, professional help may be needed for a perfect fit.

Fortunately, there are now more options available to homeowners looking to cover these distinctive windows. Whether you’re interested in soft fabric treatments like curtains, more structured options like blinds, or something more creative like DIY window treatments, there are solutions to fit any taste and budget.

How to Cover a Curved Window: Practical Approaches Explained

Now that you understand the challenges, let’s look at the practical approaches to covering a curved window. The most common and popular methods include using curtains, blinds, shades, and DIY solutions. Here’s how each option works:

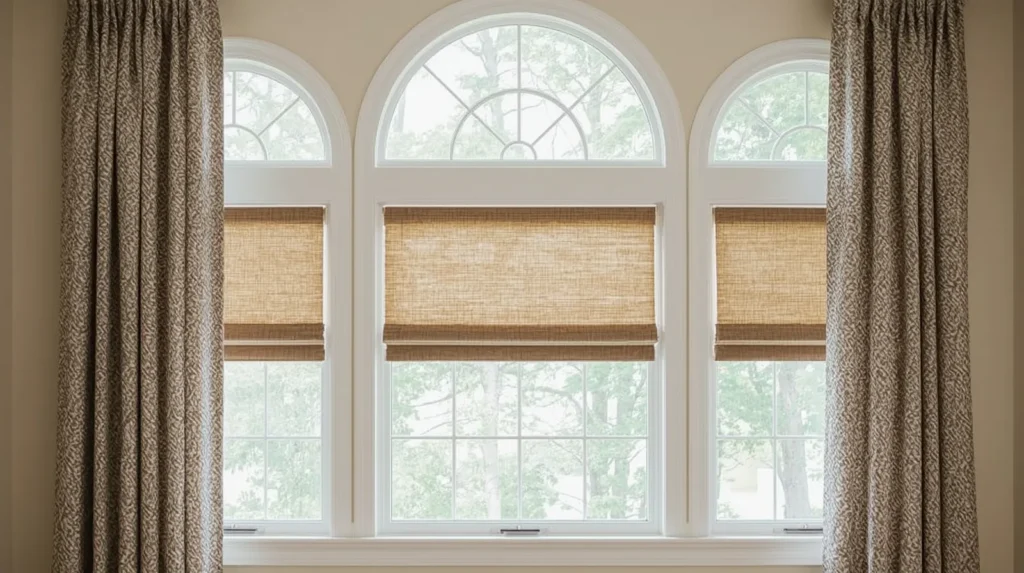
  • Curtains for Arched Windows: Curtains are an easy and flexible option for arched or half-moon windows. The fabric can be draped and shaped around the curvature of the window, offering both style and light control. For homeowners who want to soften the lines of the window, curtains offer a great solution. Sheer curtains for arched windows provide privacy without blocking natural light, while heavier drapes can provide a more dramatic look and help with insulation.
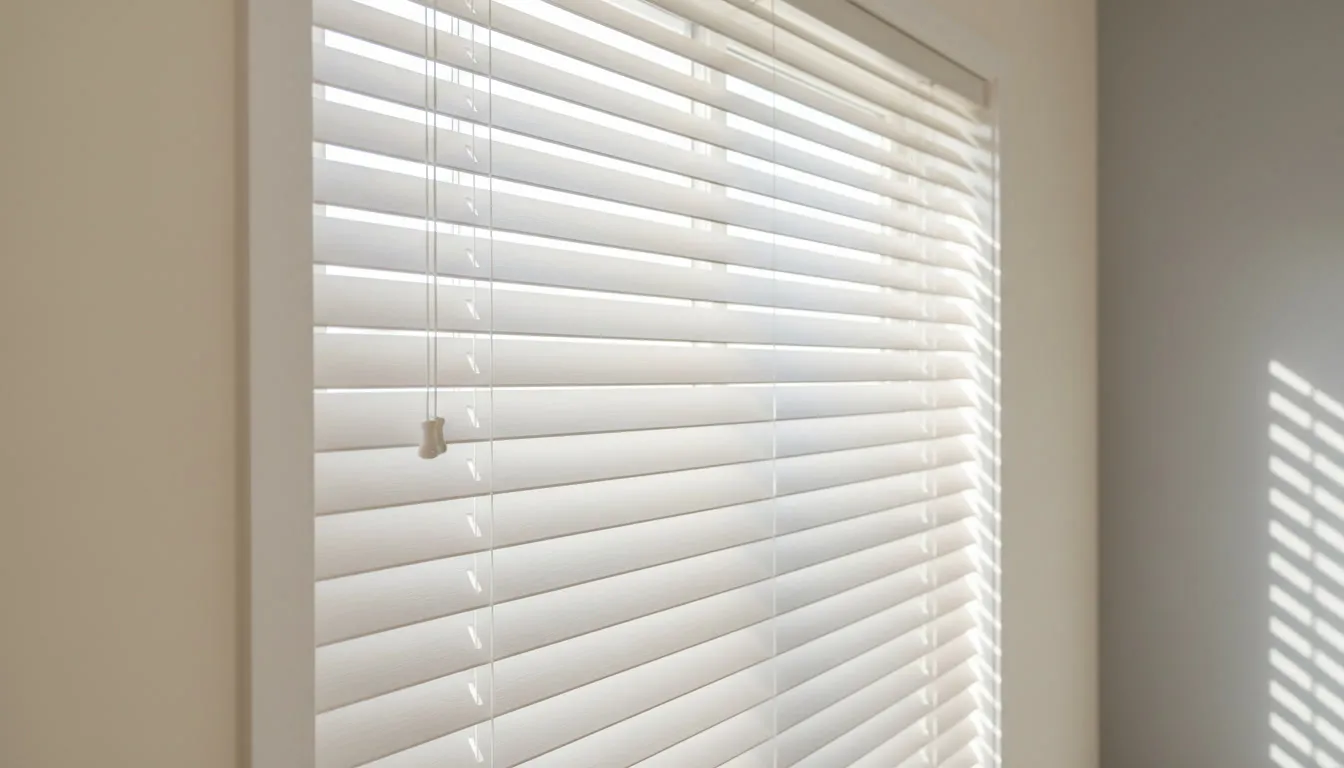
  • Blinds for Curved Windows: Half circle blinds and fan-shaped window blinds are designed to follow the curve of the window while providing excellent light control. While blinds may not offer the softness of curtains, they excel at blocking or adjusting the amount of light coming through. For semi-circle windows or half round window treatments, you can choose from various materials such as wood, faux wood, or vinyl, depending on the room’s aesthetic and function.
  • Shades for Semi-Circle and Arch Windows: Roller shades for arched windows are a simple solution for light control. You can find custom shades designed to fit curved windows, ensuring a tight and functional fit. These shades roll up and down, making them great for controlling sunlight, and they come in various fabrics and colors to match your home’s decor.
  • DIY Window Treatments for Arched Windows: DIY projects are a cost-effective way to customize your window treatments. You can create your own arch window curtain or even build a custom half-circle shade using fabric and simple tools. DIY solutions can be tailored to your needs, whether you want complete coverage or just a decorative touch. With a bit of creativity, you can turn your curved window into a focal point without spending a fortune.

Popular Options: Curtains for Arched and Round Top Windows

Curtains remain one of the most versatile and stylish choices for curved windows, especially arched and round top windows. Using fabric, you can create flowing curtains that complement the shape of the window, whether it’s a half-moon or semi-circle design. Curtains for half round windows or curtains for arched windows can be made from a variety of materials, from light, airy sheers to heavy blackout fabrics.

For half-circle windows, you might opt for a single curtain rod that spans the width of the window, curving with the window’s shape. Another option is to use a curved curtain rod designed specifically for arched windows, ensuring a smooth and even appearance.

If you want to make a statement with your window treatments, layered curtains offer an elegant option. Consider pairing sheer curtains for arched windows with heavier drapes for added privacy and warmth. This combination adds texture and depth to your space, making it feel both cozy and stylish.

Blinds and Shades: Best Choices for Half Circle and Semi-Circle Windows

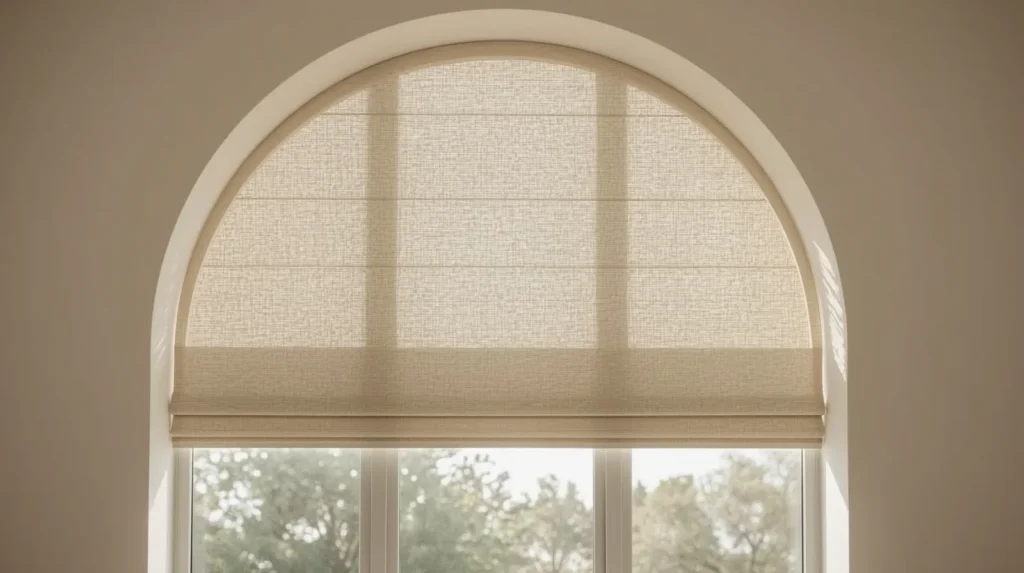
Blinds are another practical solution for covering curved windows. Half round window shades or semi-circle window shades can be custom-fit to match the curvature of your window. These blinds offer excellent control over light and privacy, making them a great option for bedrooms, living rooms, or any room where light management is important.

Fan-shaped blinds are another great choice for fan-shaped windows, as they allow you to control how much light enters the room while maintaining the window’s unique design. For half-circle windows, half circle blinds provide a clean, modern look while also offering a sleek solution for light control.

When choosing blinds or shades, it’s important to consider the material. Faux wood or vinyl blinds are durable options that provide excellent light control. You can also explore motorized or cordless blinds, especially if you have hard-to-reach windows.

Creative Window Treatments for Half Moon and Fan-Shaped Designs

For those looking to add a creative flair to their curved windows, there are several design ideas to consider. Half moon window coverings can be both functional and decorative. A fan-shaped window shade can be customized to provide a sunburst pattern that enhances the beauty of the window while offering privacy and light control.

Eyebrow arch window coverings are perfect for smaller windows or for use in entryways, providing both style and function. For longer arches, consider extended eyebrow arch window shades, which provide a soft, sweeping look that fits naturally with the window shape.

For a truly custom look, combine different types of treatments. You can mix curtains for arched windows with blinds for half moon windows, creating a layered, stylish effect that works for any space.

DIY Window Treatments for Arched and Curved Windows

If you’re a fan of DIY projects, creating your own window treatments for curved windows is a great way to save money and add a personal touch to your space. DIY arched window coverings are simple to make with fabric, curtain rods, and a few basic tools. Whether you want to create a soft curtain for a half circle window or a custom shade for a fan-shaped design, there are plenty of ideas to explore.

For half moon windows, consider creating your own half moon window curtain rod and using lightweight fabric for a flowing look. DIY arch window blinds are another option, where you can cut and design blinds to match the exact curvature of your window.

The best part of DIY projects is the freedom to choose materials that match your room’s décor. Whether you go for light sheers or thick blackout fabrics, your DIY creations will give your windows a unique, one-of-a-kind style.

Ideas to Cover Half Circle and Quarter Arch Window Styles

Covering half circle or quarter arch windows can be challenging, but there are plenty of creative ideas to make the most of these beautiful window shapes. Half circle window curtains provide a soft, flowing look, and when paired with half circle curtain rods, they create a seamless effect.

For a more structured look, half moon window treatments or quarter arch window shades provide functional coverage while adding elegance to your space. Elongated arch window shades are ideal for taller windows, offering a more dramatic look without overwhelming the space.

You can also add window tint to your half circle windows to reduce glare without sacrificing the view. Half round window coverings provide a clean, minimalist look that fits with modern home designs.

Curtains Over Arched Windows vs. Blinds for Half Round Windows

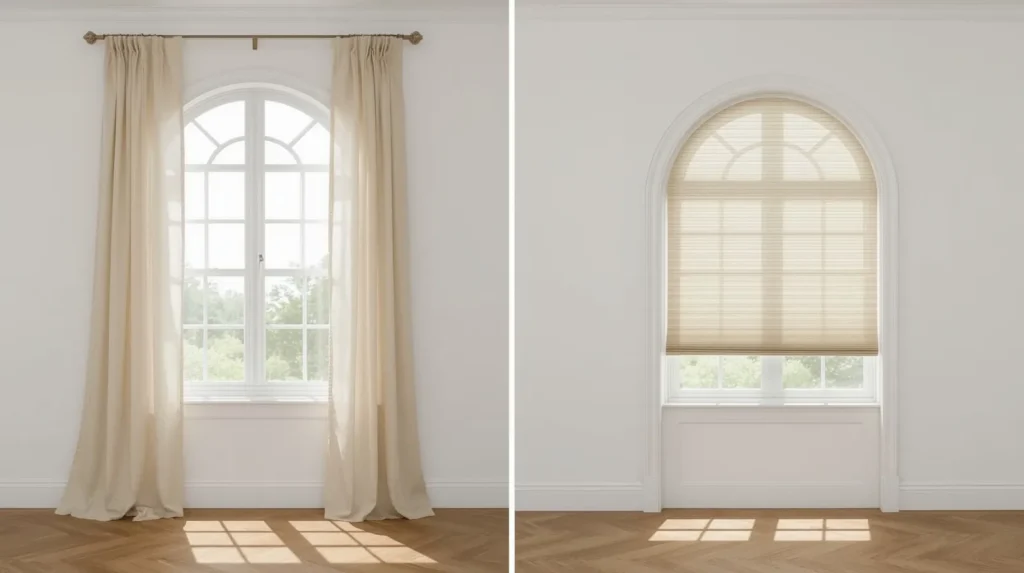
When deciding between curtains and blinds for covering curved windows, there are a few things to consider. Curtains over arched windows are great for adding softness to the room. They provide flexibility when it comes to light and privacy, and they’re easy to adjust. However, curtains may not always provide the best control over light, which is where blinds come in.

Blinds for half round windows, on the other hand, offer superior light control and are perfect for rooms where privacy is a priority. Whether you choose half circle window blinds or fan-shaped blinds, they will provide a modern and sleek solution that blends well with the window’s shape.

Expert Tips on Installing Blinds on Arched and Eyebrow Windows

Installing blinds on arched windows may seem daunting, but it’s a process that’s easier than you think. First, you need to measure the window’s dimensions carefully. Measure both the height and width at several points to account for the curve. Once you have the right measurements, you can order custom blinds for arched windows or half round window blinds.

For eyebrow arch windows, extended eyebrow arch window shades provide a solution that fits snugly while adding a sophisticated look. If you’re not comfortable installing blinds yourself, professionals like CV Floor & Blinds can handle the installation, ensuring that the blinds fit perfectly and operate smoothly.

Professional Window Coverings in Coachella, CA by CV Floor & Blinds

For homeowners in Coachella, CA, who need professional help covering their curved windows, CV Floor & Blinds is here to assist. We specialize in custom window treatments for every window shape, including arched, half circle, and fan-shaped designs. Whether you’re looking for elegant curtains or durable blinds, our team provides expert solutions tailored to your needs. Contact CV Floor & Blinds for a free consultation and let us help you find the perfect window coverings for your home.

Conclusion

Covering curved windows doesn’t have to be a challenge. With the right window treatment, you can highlight the beauty of your windows while adding privacy and functionality. From curtains for arched windows to blinds for half circle windows, the options are endless. Whether you opt for a DIY solution or professional installation, finding the perfect fit for your curved window is possible.

Looking for help with your window treatments? Contact CV Floor & Blinds for customized solutions and expert advice on covering your unique windows.

Related Post

best tile for bathroom floor

Best Tile for Bathroom Floor, A Smart and Safe Choice

The best tile for bathroom floor is the tile that gives strong grip when wet, lasts a long time, and stays safe for daily use. The top choice for most homes is a textured porcelain tile with a good slip rating. It handles water well and stays strong for many years. This guide explains how to choose safe tiles, how slip resistance works, and how to avoid slippery porcelain tiles. It also shares simple tips so you can find a tile that is both safe and stylish. The content is written in clear language so anyone can understand it. What Makes a Bathroom Floor Tile Truly Safe and Strong A bathroom is one of the most used rooms in a home. It is where water touches the floor every single day. This is why the tile you choose must do more than look modern or match your wall color. A safe tile gives you grip when you are stepping out of the shower. It feels steady even if your feet are damp. It does not become slick when you use soap or shampoo. A strong tile also handles years of foot traffic. It does not chip easily. It does not absorb moisture. It stays firm under your feet and holds its shape. When a tile has these qualities, you can count on it for long term comfort and safety. Choosing a bathroom tile is not only about beauty. It is about choosing the tile that protects your family every day. Many homeowners do not realize how much water moves around inside a bathroom. Every shower, every bath, and every sink splash adds moisture. If a floor tile cannot handle this moisture, it will become slippery or stained. That is why bathroom tile must be designed with safety in mind. How Bathroom Floors Become Slippery and Hard to Maintain Bathroom floors become slippery for many different reasons. A very smooth tile gives very little traction. When water mixes with soap, it creates a thin layer that makes the surface even more slick. With time, tiles can also develop a worn layer that traps soap scum and body oils. This layer makes the floor feel slippery even when it is dry. Another common reason for slippery floors is poor ventilation. When humidity stays trapped inside the room, the floor remains damp longer. Damp surfaces collect dust faster. Dust mixes with moisture and creates a thin film that acts like grease on the tile. Cleaning habits also matter. Some cleaning products leave a shiny finish on tile floors. This shine may look nice, but it reduces grip. It can make tiles feel like ice when they get wet. When tiles stay wet for long hours, mold and mildew can also grow between the grout lines. Mold causes surfaces to become slimy. These problems happen slowly, and most homeowners do not notice the changes. But over months and years, the tile loses its original traction and becomes unsafe. Understanding these causes helps you choose tiles that avoid these issues from the start. The Qualities That Define the Best Tile for Bathroom Floor To choose the best tile for bathroom floor designs, think about how the tile behaves when it is wet. The top bathroom tiles perform well in four areas. They resist water. They give you traction. They are strong. They are easy to clean. Water resistance is the most important. A tile that absorbs water can swell or crack. Porcelain tiles are known for absorbing very little water. This makes them ideal for wet spaces. Grip is the second big factor. A tile with more texture gives better stability. You can feel safer on a textured tile even with soapy water present. Strength and durability matter because bathroom tiles face heavy use. They handle drops, foot pressure, and cleaning chemicals. Ease of cleaning is also important. Tiles that resist buildup stay safer because they prevent slippery layers from forming. A tile that offers all four qualities gives you a floor that works well for many years. Understanding Slip Resistance and Why It Matters Slip resistance protects your family from falls. Many homeowners think slips only happen to seniors, but everyone is at risk in a bathroom. Children run around. Adults step out of the shower quickly. Teenagers walk in with wet feet. All of this creates daily chances for slipping. Slip resistance is measured with ratings like COF. A higher COF number means the tile grips better. You do not have to study numbers. You only need to look for tiles labeled as slip resistant or non slip for bathrooms. Tiles made for wet rooms are tested for traction. They support your balance even on busy days. When you choose tiles with good slip resistance, you create a safer bathroom for your entire family. Are Porcelain Tiles Safe or Slippery for the Bathroom Space Porcelain tiles are known for strength, but not all porcelain tiles are safe. The danger comes from very shiny surfaces. Shiny porcelain can turn into slippery porcelain tiles when mixed with water. This makes them unsafe for wet spaces. However, porcelain tiles with a matte finish or textured finish offer great traction. They feel steady, even with damp feet. These textured tiles stay cool, resist stains, and look elegant. Homeowners like them because they offer both safety and beauty. Porcelain tiles also hold up well in homes with heavy foot traffic. They resist scratches and daily wear. When you choose porcelain tiles designed for wet areas, you get one of the safest and most durable flooring options. Which Tile Types Work Best for Wet and High Moisture Areas A Simple Guide to Non Slip Bathroom Floor Tiles for Everyday Use Non slip bathroom floor tiles work well because they have natural traction. They use texture, bumps, and matte finishes to give you grip. They do not rely on sticky coatings. They stay safe even with daily cleaning. People choose these tiles for practical reasons. They clean easily. They

Read More »
best carpet for high traffic areas

Best Carpet for High Traffic Areas for a Beautiful Home

The best carpet for high traffic areas is usually a low pile, dense carpet made from strong materials like nylon or high quality synthetic fibers. These carpets handle footsteps, kids, pets, and busy daily life without wearing out too fast. They stay cleaner, last longer, and keep their shape even when people walk on them every day. If you want a carpet that holds up in busy rooms, carpets with tight fibers, strong materials, and good stain resistance will give you the longest life and best comfort. What to Know Before You Buy Choosing carpet for your home should feel exciting, not stressful. Carpet can make a space warm, peaceful, and comfortable. It adds color, style, and softness to every room. But when a home has busy rooms with lots of walking, playing, and daily movement, some carpets start to look old too quickly. Families often notice flat fibers, dark pathways, stains, or fading long before they planned to replace their flooring. This happens because not all carpets are made the same. Some carpets are meant for calm rooms like guest bedrooms. Others are built for busy hallways, living rooms, stairs, and family spaces. The key to keeping your floors in good shape is choosing the right type of carpet for the amount of activity in your home. This detailed guide explains everything you need to know about finding a strong, long lasting carpet that stays beautiful even in active areas. It shares real world experience, expert advice, and clear steps so you can make the best decision for your home without confusion. Why Some Rooms Wear Down Carpet Faster Some rooms take a lot more pressure than others. Foot traffic describes how often people walk across a space. When a room has high foot traffic, the carpet fibers get stepped on constantly throughout the day. Over time the pressure from feet pushes the fibers down. Eventually they become flat, dull, and unable to bounce back. Hallways and stairs usually wear out first because they are used the most. Living rooms and family rooms also get steady traffic because families spend so much time there. Kids run, pets play, guests visit, and everyday life always moves through these areas. Another reason busy rooms wear down faster is dirt. Even clean homes deal with dust, hair, crumbs, and tiny pieces of outdoor debris. These small particles fall into the carpet and rub against the fibers. Over time this rubbing works like soft sandpaper and slowly wears the carpet down. That is why choosing the right carpet matters so much. What Makes a Carpet Truly Durable Carpet durability depends on several simple but powerful features. When these features work together, the carpet stays strong for years even in busy spaces. 1. Fiber Density Density means how tightly the fibers are packed together. High density carpet feels firm and full. When you press your fingers into it, the fibers push back. Low density carpet feels airy and soft but flattens fast. In high traffic rooms, high density always performs better. 2. Twist Level Twist level describes how tightly each fiber is twisted. Strong twist helps the carpet bounce back after footsteps. Loose twist looks messy quickly. The higher the twist level, the better the carpet handles daily use. 3. Pile Height Long fibers feel soft but crush easily. Short fibers stay strong longer. Low pile carpet is one of the best choices for heavy use because it resists matting and keeps its shape. 4. Backing Quality Backing holds the carpet together. A strong backing helps the carpet stay flat and prevents stretching or ripples. This helps keep the carpet looking newer for a longer time. 5. Stain and Soil Resistance Busy rooms always have spills and dirt. Stain resistant treatments help protect the carpet so you can clean messes before they soak deep. This keeps the carpet bright and fresh. Comparing Carpet Types for Busy Homes Carpet construction plays a big role in how long it lasts. Each type has different strengths. Loop Pile Carpet Loop pile has fibers that loop back into the backing. This creates a firm structure that stays strong. It is very popular for high traffic rooms because it resists crushing. Berber is the most well known loop pile style. It hides footprints well and performs beautifully in busy spaces. Cut Pile Carpet Cut pile has fibers that stand straight up. The softness depends on fiber length and density. Some cut pile carpets are extremely durable, especially when the fibers are short and tightly packed. These carpets combine comfort and strength for active homes. Textured Carpet Textured carpet has fibers of slightly different lengths. This helps hide footprints and keeps the carpet looking fresh. Textured carpet also works well in busy rooms because the pattern disguises early signs of wear. Patterned Carpet Patterned carpet mixes loop and cut pile styles together. This creates visual interest and helps hide daily traffic. Many families choose patterned carpet for living rooms or stairs because it gives a stylish touch while staying durable. The Best Carpet Materials for High Traffic Areas The material used to make carpet fibers is one of the biggest factors in how well it lasts. Some materials stay strong and firm, while others flatten faster. Nylon Nylon is one of the best carpet materials for active homes. It is strong, flexible, and able to bounce back after being stepped on. Nylon carpets last a long time and handle busy rooms extremely well. They also resist fading and staining when treated properly. Polyester Polyester is soft and comes in bright colors. Its stain resistance is excellent. However, it may not stay strong in very busy rooms. Modern polyester blends have improved, but nylon still leads in strength. High Quality Synthetic Blends Some synthetic carpets are designed specifically for durability. These blends combine comfort, stain resistance, and firmness. They are a good choice for families that want long life without the higher cost of premium nylon. Wool Wool is natural,

Read More »
how to fix scratches on engineered wood floors

How to Fix Scratches on Engineered Wood Floors the Smart Way

The clear answer to how to fix scratches on engineered wood floors is to clean the area, identify the scratch depth, and then use the right method, such as repair markers for light marks, filler for medium scratches, and sanding plus board replacement for deep damage. These steps help restore the floor and keep it looking fresh. Scratches happen all the time, even when you try your best to care for your floors. Engineered wood is strong, but its top layer can still mark easily. In this guide, you will learn simple and safe ways to repair the scratches you see at home. The steps are easy, the tools are simple, and you will understand what works for each type of scratch level. This blog also gives you guidance on when you can fix damage yourself and when it may be better to talk with a flooring expert. Why Scratches Appear Easily on Engineered Wood Floors Engineered wood floors look warm and natural, but the surface is often thinner than solid hardwood. The top layer is real wood, so it can still scratch when something sharp rubs across it. Pets running, chairs sliding, grit from shoes, and toys on the floor all cause small marks. Since the top wood layer is not thick, heavy sanding is usually not a good option. This is why many owners see scratches sooner than they expect. The good news is that most scratches can be fixed with simple tools, patience, and the right steps. Common Causes of Floor Scratches You May Not Notice Many scratches on engineered wood do not appear right away. They build slowly. Here are the most common causes. You may not see these scratches right away, but they add up over time. Knowing the cause helps you avoid future damage. How to Identify Light, Medium, and Deep Floor Scratches Before trying to fix floor scratches, take time to study the damage. Not all scratches are the same. There are three main types: Light scratches These are surface level marks that only affect the finish. You can see them when the light hits the floor. You cannot feel them with your finger. These are the easiest to fix. Medium scratches These marks cut into the finish and lightly touch the wood layer. You can feel them a little when you run your finger across. They need repair kits, touch up markers, or filler sticks. Deep scratches These cuts break through the finish and go into the wood layer. They look darker and may feel rough. Deep scratches often need sanding in a small spot or replacing a plank, since engineered wood has a thin top layer. Knowing the scratch type helps you choose the right method and keeps you from making the damage worse. Quick Ways to Fix Light Scratches on Engineered Wood Floors Light scratches are common and easy to fix. These scratches sit on the top coat. You can use simple items to make them blend into the rest of the floor. Step 1: Clean the area Use a soft cloth with a gentle floor cleaner. This removes dirt so you can see the scratch clearly. Step 2: Use a repair marker Repair markers match wood color well. Draw lightly over the scratch, then wipe the extra marker with a clean cloth. Always test it first on a hidden area. Step 3: Add a polish A safe wood floor polish can help blend everything and reduce the shine difference. Apply a small amount and gently buff the spot. Step 4: Check the results If the scratch still shows, apply a second layer of marker or polish. These small steps work well for most light surface marks. They also help with light scuffs and small rub lines. How to Fix Medium Floor Scratches With Repair Kits Medium scratches go a little deeper, so repair markers alone may not be enough. Here is what works best. Step 1: Clean and dry the area Dirt prevents fillers from sticking well, so start with a clean spot. Step 2: Use a wax or putty filler Most home stores sell repair kits made for engineered wood floors. Pick a filler color that matches your floor. Warm the wax slightly with your hand and press it into the scratch. If using putty, press a small amount into the scratch with a plastic tool. Step 3: Smooth the surface Use a plastic scraper to level the filler. Do not use metal tools because they can create more scratches. Step 4: Color blend the repair A touch up marker can help the filler match the floor tone. Light strokes work best. Step 5: Add a gentle top coat A small amount of finish or polish helps seal the repair. Medium scratches often disappear after these steps, and the surface feels smooth again. How to Fix Deep Scratches on Engineered Wood Floors Deep scratches are the hardest to fix because they cut past the finish and into the wood. Since engineered wood has a thin top layer, heavy sanding could remove too much wood. So you need to use safer methods. Option 1: Spot sanding Light spot sanding can help if the scratch is not too deep. Use very fine sandpaper. Sand gently in the direction of the wood grain. Stop quickly if the color changes too much. Option 2: Use wood filler Deep cuts can be filled with color matching wood filler. Apply it firmly and smooth it out. After it dries, add a touch up marker to match the floor shade. Option 3: Replace the plank If the scratch is very deep or wide, the best fix is replacing the damaged plank. This keeps the floor level and protects the rest of the structure. Because engineered wood uses a click or glue system, replacing one board may need help from someone with experience. Deep scratches look scary, but they can be restored with care and patience. When to Call CV Floor and Blinds in Coachella,

Read More »
Table of Contents