How Long Should Curtains be in bedroom: Expert Tips

So, how long should curtains be in bedroom? The best curtain length for most bedrooms is floor-length, meaning the curtains should just touch or slightly hover above the floor (about half an inch). This gives your room a polished, cozy, and balanced look. Short curtains can work for smaller windows or tight spaces, but long curtains usually look more elegant and help make the room feel taller and more spacious.

Why Curtain Length Matters More Than You Think

Curtains might seem like a small detail, but they have a big impact on how your bedroom looks and feels. They control light, add softness to the space, and play a key role in your room’s mood. The right curtain length can visually stretch your walls, make your ceilings appear taller, and bring a finished look to your entire décor.

Imagine two identical bedrooms one with short curtains stopping mid-wall, and one with long, flowing curtains that almost touch the floor. The second room immediately feels calmer, taller, and more intentional. That’s the power of curtain length.

Interior designers often say curtains act like the “frame” around your bedroom’s view. Without the right length, that frame can look off-balance. Long curtains feel graceful and cohesive, while short ones can feel abrupt unless they’re used for specific practical reasons.

So, even before you pick your fabric or color, think about how your curtain length will influence the way your bedroom feels when you walk in.

Understanding Bedroom Curtain Basics Before Choosing Sizes

Before you buy or hang your curtains, it’s important to understand the basics curtain sizes, rod placement, and how window proportions affect the overall design.

Curtains come in a few standard sizes like 63, 84, 96, 108, and 120 inches. However, your perfect size depends on how high you hang your curtain rod. Mounting your rod 6–8 inches above the window frame gives a more open, spacious feel.

There are three main types of curtain drops:

  • Sill-length curtains: These end right at the window sill and work well for smaller or older-style bedrooms.
  • Apron-length curtains: These hang just below the sill, perfect for casual or cottage-style spaces.
  • Floor-length curtains: The most common and stylish choice for bedrooms, giving a soft, full, and elegant appearance.

Think of this as building a foundation. If your rod is too low or your curtain too short, the entire look can feel incomplete. On the other hand, properly measured curtains can make even a simple bedroom feel like a designer’s work.

How Long Should Curtains Be in Bedroom

The ideal curtain length for bedrooms is typically floor-length or slightly shorter about half an inch above the floor. This creates a neat, tailored look without letting the fabric drag and gather dust.

If you want a cozy, romantic touch, let the curtains just “kiss” the floor. This means the hem barely brushes the ground, which adds softness and elegance. For a more dramatic or formal look, some people choose “puddled” curtains fabric that extends 1–2 inches onto the floor.

Professional Tip: For busy households or homes with pets, hovering curtains (about half an inch off the floor) are practical and still stylish. They’re easy to clean around and don’t collect dirt.

In design terms, curtain length should match your personality and lifestyle. If you love a clean, modern look, go for precise measurements. If you love a dreamy, hotel-like atmosphere, try slightly longer panels that softly rest on the floor.

Ideal Curtain Length Explained in Simple Terms

Ideal Curtain Length Explained in Simple Terms

When you hear “ideal curtain length,” it simply means choosing the length that fits your room’s height, design style, and daily use.

For example, a bedroom with low ceilings can instantly look taller when you hang your curtain rod closer to the ceiling and use long panels that go all the way to the floor. This vertical line draws the eyes upward, making your room appear larger.

For high ceilings, long curtains are almost always a must. They bring warmth and balance to tall walls that might otherwise feel empty.

If your bed or dresser sits below the window, you might consider apron-length curtains to keep things neat and accessible. But remember, shorter curtains are best reserved for specific situations most modern bedrooms look better with long ones.

Pro Insight: When in doubt, go longer rather than shorter. You can always hem extra fabric, but you can’t add length later.

Which Curtain Length Looks Best for Different Bedroom Styles

The right curtain length depends not only on your window height but also on your bedroom’s style. Let’s break it down by look and mood:

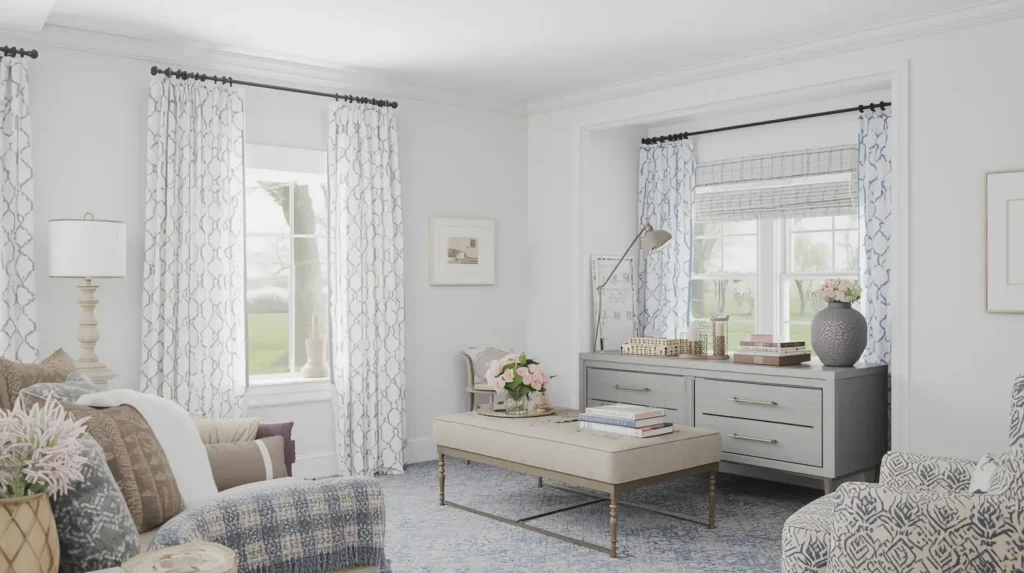
  • Modern or Minimalist Bedrooms: Clean, floor-grazing curtains that hover just above the ground create a crisp, uncluttered feel. Think neutral tones and light fabrics like linen or cotton.
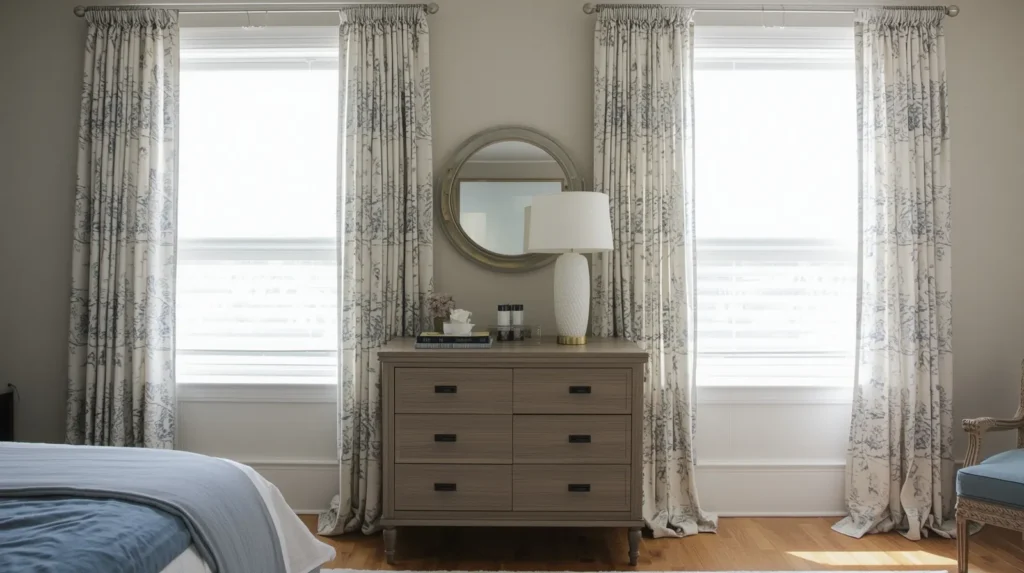
  • Classic or Traditional Bedrooms: Floor-length curtains that gently touch the floor give a timeless, graceful appearance. Heavier fabrics like velvet or damask work beautifully here.
  • Coastal or Relaxed Bedrooms: Curtains that float about one inch above the floor allow for easy air circulation and give a breezy, casual look.
  • Romantic Bedrooms: Try curtains that “puddle” slightly. That extra fabric creates softness and gives a sense of luxury.

Each style tells a story. The secret is choosing a curtain length that matches your room’s personality. For instance, pairing long velvet curtains with modern furniture might clash, but pairing them with antique wood tones can look stunning.

Design harmony is the goal and curtain length is one of the easiest ways to achieve it.

Bedroom Curtain Sizes: How to Measure for a Perfect Fit

Getting your curtain length right starts with proper measuring. Here’s how to do it like a pro:

  1. Decide where to mount your curtain rod. For a taller appearance, mount it several inches above the window frame.
  2. Measure from the top of the rod (not the window) to the point where you want the curtain to end usually the floor.
  3. Account for curtain style. If you want them to kiss or puddle, add an inch or two.
  4. Measure window width and multiply by two. This ensures full, gathered coverage even when closed.

For example, if your window is 50 inches wide, your curtain panels should total about 100 inches in width. This keeps them from looking flat or too tight when drawn.

Expert Tip: Always measure twice. It might seem simple, but curtain length errors are among the most common mistakes homeowners make. Measuring correctly saves money, time, and frustration.

At CV Floor & Blinds, we’ve seen how custom-length curtains elevate a bedroom instantly. When curtains perfectly fit the window and touch the floor neatly, the entire room feels more peaceful and complete.

Short Curtains vs Long Curtains Which Works Better in Bedrooms

Let’s settle this debate once and for all.

Short curtains:

  • Work best for children’s rooms or small windows above furniture.
  • Are easy to clean and maintain.
  • Can feel casual or playful in design.

Long curtains:

  • Make ceilings look taller.
  • Add elegance, warmth, and softness.
  • Are more flexible across different design styles.

A good way to decide is by considering room purpose. A master bedroom benefits from long, elegant curtains, while a kid’s room may need shorter ones for practicality.

Imagine standing in a hotel suite every curtain you see touches the floor. That’s not an accident; it’s design psychology. Long curtains frame the window and ground the entire space, giving your eyes a natural flow from top to bottom.

So, when comparing short curtains vs long curtains, long wins for adults, style, and comfort.

Should Bedroom Curtains Touch the Floor or Stop Short

Should Bedroom Curtains Touch the Floor or Stop Short

This question comes up often, and the answer depends on your personal taste and maintenance habits.

If you like neat and tidy spaces, have your curtains hover half an inch above the floor. It’s practical, especially if you vacuum often or live in a dusty environment.

If you love luxury or dramatic style, go for curtains that touch the floor or have a small “puddle” of fabric. These create a soft, layered effect that looks great in cozy bedrooms.

However, avoid curtains that hang awkwardly several inches above the floor. They make the window look unfinished and smaller than it really is.

Professional Advice:

  • In busy homes, hovering curtains are best.
  • In formal or guest bedrooms, floor-touching curtains add warmth and sophistication.
  • If your floor is uneven, slightly hovering curtains will keep everything looking even.

This balance between beauty and practicality is key to making your bedroom feel both clean and comfortable.

Common Mistakes When Choosing Curtain Length

Even with all this information, many homeowners still run into problems. Here are the biggest mistakes to avoid:

  1. Guessing measurements: Always measure your windows and rod placement. Guessing often leads to costly re-dos.
  2. Buying pre-sized curtains without checking your wall height: Not all ceilings are standard height, and pre-sized curtains might fall short.
  3. Hanging rods too low: Mounting the rod just above the frame makes the window look smaller. Raise it higher for a designer touch.
  4. Forgetting about furniture placement: A headboard or nightstand under the window might affect your curtain length choice.
  5. Choosing fabric that’s too stiff: Heavy or stiff materials don’t drape nicely at floor-length. Opt for soft fabrics that flow.

Example:
A homeowner once installed 84-inch curtains for their 9-foot ceilings. The result? The curtains ended 6 inches too short, making the room feel awkwardly cut off. Once replaced with 96-inch panels, the whole room looked taller and more balanced.

Small adjustments like this can completely transform the way your bedroom feels.

Expert Tips from CV Floor & Blinds for Beautiful Results in Coachella, CA

At CV Floor & Blinds, we’ve helped countless homeowners find the perfect curtain length and fabric combination for their bedrooms. Here are some expert tips that can make your space stand out:

  • Match your curtain color to your wall undertones. This creates harmony and prevents visual clutter.
  • Layer curtains and sheers. This allows light control and privacy while maintaining elegance.
  • Always go wider than your window. Extend the rod at least 4–6 inches past each side of the window frame. This makes windows look larger.
  • Steam your curtains after hanging. Wrinkles can make even expensive fabric look cheap.
  • Invest in good hardware. Quality rods and rings make a difference in how smoothly curtains move and how long they last.

When done right, your curtains won’t just look beautiful they’ll enhance your sleep environment. Proper light control means you can rest better while enjoying a room that feels stylish and complete.

Final Thoughts: Creating a Balanced, Cozy Bedroom with the Right Curtain Length

Curtains are one of those design elements that often get overlooked but make one of the biggest impacts once installed correctly.

The perfect curtain length brings everything together the bed, the windows, the light, and the walls. It makes your room feel taller, softer, and more cohesive. And while there are general rules to follow, your personal taste and comfort always come first.

If you ever feel uncertain, remember this: Curtains that touch or nearly touch the floor will almost always look right. They’re timeless, practical, and flattering to nearly every room style.

So whether you’re redecorating your entire home or just freshening up your bedroom, take the time to measure carefully and visualize the final result. The few extra minutes you spend planning will reward you with years of comfort and beauty.

Ready to transform your bedroom? Contact CV Floor & Blinds today for expert help choosing, measuring, and installing your dream curtains. Our team can guide you through styles, fabrics, and lengths to create a bedroom that looks as good as it feels.

Related Post

best tile for bathroom floor

Best Tile for Bathroom Floor, A Smart and Safe Choice

The best tile for bathroom floor is the tile that gives strong grip when wet, lasts a long time, and stays safe for daily use. The top choice for most homes is a textured porcelain tile with a good slip rating. It handles water well and stays strong for many years. This guide explains how to choose safe tiles, how slip resistance works, and how to avoid slippery porcelain tiles. It also shares simple tips so you can find a tile that is both safe and stylish. The content is written in clear language so anyone can understand it. What Makes a Bathroom Floor Tile Truly Safe and Strong A bathroom is one of the most used rooms in a home. It is where water touches the floor every single day. This is why the tile you choose must do more than look modern or match your wall color. A safe tile gives you grip when you are stepping out of the shower. It feels steady even if your feet are damp. It does not become slick when you use soap or shampoo. A strong tile also handles years of foot traffic. It does not chip easily. It does not absorb moisture. It stays firm under your feet and holds its shape. When a tile has these qualities, you can count on it for long term comfort and safety. Choosing a bathroom tile is not only about beauty. It is about choosing the tile that protects your family every day. Many homeowners do not realize how much water moves around inside a bathroom. Every shower, every bath, and every sink splash adds moisture. If a floor tile cannot handle this moisture, it will become slippery or stained. That is why bathroom tile must be designed with safety in mind. How Bathroom Floors Become Slippery and Hard to Maintain Bathroom floors become slippery for many different reasons. A very smooth tile gives very little traction. When water mixes with soap, it creates a thin layer that makes the surface even more slick. With time, tiles can also develop a worn layer that traps soap scum and body oils. This layer makes the floor feel slippery even when it is dry. Another common reason for slippery floors is poor ventilation. When humidity stays trapped inside the room, the floor remains damp longer. Damp surfaces collect dust faster. Dust mixes with moisture and creates a thin film that acts like grease on the tile. Cleaning habits also matter. Some cleaning products leave a shiny finish on tile floors. This shine may look nice, but it reduces grip. It can make tiles feel like ice when they get wet. When tiles stay wet for long hours, mold and mildew can also grow between the grout lines. Mold causes surfaces to become slimy. These problems happen slowly, and most homeowners do not notice the changes. But over months and years, the tile loses its original traction and becomes unsafe. Understanding these causes helps you choose tiles that avoid these issues from the start. The Qualities That Define the Best Tile for Bathroom Floor To choose the best tile for bathroom floor designs, think about how the tile behaves when it is wet. The top bathroom tiles perform well in four areas. They resist water. They give you traction. They are strong. They are easy to clean. Water resistance is the most important. A tile that absorbs water can swell or crack. Porcelain tiles are known for absorbing very little water. This makes them ideal for wet spaces. Grip is the second big factor. A tile with more texture gives better stability. You can feel safer on a textured tile even with soapy water present. Strength and durability matter because bathroom tiles face heavy use. They handle drops, foot pressure, and cleaning chemicals. Ease of cleaning is also important. Tiles that resist buildup stay safer because they prevent slippery layers from forming. A tile that offers all four qualities gives you a floor that works well for many years. Understanding Slip Resistance and Why It Matters Slip resistance protects your family from falls. Many homeowners think slips only happen to seniors, but everyone is at risk in a bathroom. Children run around. Adults step out of the shower quickly. Teenagers walk in with wet feet. All of this creates daily chances for slipping. Slip resistance is measured with ratings like COF. A higher COF number means the tile grips better. You do not have to study numbers. You only need to look for tiles labeled as slip resistant or non slip for bathrooms. Tiles made for wet rooms are tested for traction. They support your balance even on busy days. When you choose tiles with good slip resistance, you create a safer bathroom for your entire family. Are Porcelain Tiles Safe or Slippery for the Bathroom Space Porcelain tiles are known for strength, but not all porcelain tiles are safe. The danger comes from very shiny surfaces. Shiny porcelain can turn into slippery porcelain tiles when mixed with water. This makes them unsafe for wet spaces. However, porcelain tiles with a matte finish or textured finish offer great traction. They feel steady, even with damp feet. These textured tiles stay cool, resist stains, and look elegant. Homeowners like them because they offer both safety and beauty. Porcelain tiles also hold up well in homes with heavy foot traffic. They resist scratches and daily wear. When you choose porcelain tiles designed for wet areas, you get one of the safest and most durable flooring options. Which Tile Types Work Best for Wet and High Moisture Areas A Simple Guide to Non Slip Bathroom Floor Tiles for Everyday Use Non slip bathroom floor tiles work well because they have natural traction. They use texture, bumps, and matte finishes to give you grip. They do not rely on sticky coatings. They stay safe even with daily cleaning. People choose these tiles for practical reasons. They clean easily. They

Read More »
best carpet for high traffic areas

Best Carpet for High Traffic Areas for a Beautiful Home

The best carpet for high traffic areas is usually a low pile, dense carpet made from strong materials like nylon or high quality synthetic fibers. These carpets handle footsteps, kids, pets, and busy daily life without wearing out too fast. They stay cleaner, last longer, and keep their shape even when people walk on them every day. If you want a carpet that holds up in busy rooms, carpets with tight fibers, strong materials, and good stain resistance will give you the longest life and best comfort. What to Know Before You Buy Choosing carpet for your home should feel exciting, not stressful. Carpet can make a space warm, peaceful, and comfortable. It adds color, style, and softness to every room. But when a home has busy rooms with lots of walking, playing, and daily movement, some carpets start to look old too quickly. Families often notice flat fibers, dark pathways, stains, or fading long before they planned to replace their flooring. This happens because not all carpets are made the same. Some carpets are meant for calm rooms like guest bedrooms. Others are built for busy hallways, living rooms, stairs, and family spaces. The key to keeping your floors in good shape is choosing the right type of carpet for the amount of activity in your home. This detailed guide explains everything you need to know about finding a strong, long lasting carpet that stays beautiful even in active areas. It shares real world experience, expert advice, and clear steps so you can make the best decision for your home without confusion. Why Some Rooms Wear Down Carpet Faster Some rooms take a lot more pressure than others. Foot traffic describes how often people walk across a space. When a room has high foot traffic, the carpet fibers get stepped on constantly throughout the day. Over time the pressure from feet pushes the fibers down. Eventually they become flat, dull, and unable to bounce back. Hallways and stairs usually wear out first because they are used the most. Living rooms and family rooms also get steady traffic because families spend so much time there. Kids run, pets play, guests visit, and everyday life always moves through these areas. Another reason busy rooms wear down faster is dirt. Even clean homes deal with dust, hair, crumbs, and tiny pieces of outdoor debris. These small particles fall into the carpet and rub against the fibers. Over time this rubbing works like soft sandpaper and slowly wears the carpet down. That is why choosing the right carpet matters so much. What Makes a Carpet Truly Durable Carpet durability depends on several simple but powerful features. When these features work together, the carpet stays strong for years even in busy spaces. 1. Fiber Density Density means how tightly the fibers are packed together. High density carpet feels firm and full. When you press your fingers into it, the fibers push back. Low density carpet feels airy and soft but flattens fast. In high traffic rooms, high density always performs better. 2. Twist Level Twist level describes how tightly each fiber is twisted. Strong twist helps the carpet bounce back after footsteps. Loose twist looks messy quickly. The higher the twist level, the better the carpet handles daily use. 3. Pile Height Long fibers feel soft but crush easily. Short fibers stay strong longer. Low pile carpet is one of the best choices for heavy use because it resists matting and keeps its shape. 4. Backing Quality Backing holds the carpet together. A strong backing helps the carpet stay flat and prevents stretching or ripples. This helps keep the carpet looking newer for a longer time. 5. Stain and Soil Resistance Busy rooms always have spills and dirt. Stain resistant treatments help protect the carpet so you can clean messes before they soak deep. This keeps the carpet bright and fresh. Comparing Carpet Types for Busy Homes Carpet construction plays a big role in how long it lasts. Each type has different strengths. Loop Pile Carpet Loop pile has fibers that loop back into the backing. This creates a firm structure that stays strong. It is very popular for high traffic rooms because it resists crushing. Berber is the most well known loop pile style. It hides footprints well and performs beautifully in busy spaces. Cut Pile Carpet Cut pile has fibers that stand straight up. The softness depends on fiber length and density. Some cut pile carpets are extremely durable, especially when the fibers are short and tightly packed. These carpets combine comfort and strength for active homes. Textured Carpet Textured carpet has fibers of slightly different lengths. This helps hide footprints and keeps the carpet looking fresh. Textured carpet also works well in busy rooms because the pattern disguises early signs of wear. Patterned Carpet Patterned carpet mixes loop and cut pile styles together. This creates visual interest and helps hide daily traffic. Many families choose patterned carpet for living rooms or stairs because it gives a stylish touch while staying durable. The Best Carpet Materials for High Traffic Areas The material used to make carpet fibers is one of the biggest factors in how well it lasts. Some materials stay strong and firm, while others flatten faster. Nylon Nylon is one of the best carpet materials for active homes. It is strong, flexible, and able to bounce back after being stepped on. Nylon carpets last a long time and handle busy rooms extremely well. They also resist fading and staining when treated properly. Polyester Polyester is soft and comes in bright colors. Its stain resistance is excellent. However, it may not stay strong in very busy rooms. Modern polyester blends have improved, but nylon still leads in strength. High Quality Synthetic Blends Some synthetic carpets are designed specifically for durability. These blends combine comfort, stain resistance, and firmness. They are a good choice for families that want long life without the higher cost of premium nylon. Wool Wool is natural,

Read More »
how to fix scratches on engineered wood floors

How to Fix Scratches on Engineered Wood Floors the Smart Way

The clear answer to how to fix scratches on engineered wood floors is to clean the area, identify the scratch depth, and then use the right method, such as repair markers for light marks, filler for medium scratches, and sanding plus board replacement for deep damage. These steps help restore the floor and keep it looking fresh. Scratches happen all the time, even when you try your best to care for your floors. Engineered wood is strong, but its top layer can still mark easily. In this guide, you will learn simple and safe ways to repair the scratches you see at home. The steps are easy, the tools are simple, and you will understand what works for each type of scratch level. This blog also gives you guidance on when you can fix damage yourself and when it may be better to talk with a flooring expert. Why Scratches Appear Easily on Engineered Wood Floors Engineered wood floors look warm and natural, but the surface is often thinner than solid hardwood. The top layer is real wood, so it can still scratch when something sharp rubs across it. Pets running, chairs sliding, grit from shoes, and toys on the floor all cause small marks. Since the top wood layer is not thick, heavy sanding is usually not a good option. This is why many owners see scratches sooner than they expect. The good news is that most scratches can be fixed with simple tools, patience, and the right steps. Common Causes of Floor Scratches You May Not Notice Many scratches on engineered wood do not appear right away. They build slowly. Here are the most common causes. You may not see these scratches right away, but they add up over time. Knowing the cause helps you avoid future damage. How to Identify Light, Medium, and Deep Floor Scratches Before trying to fix floor scratches, take time to study the damage. Not all scratches are the same. There are three main types: Light scratches These are surface level marks that only affect the finish. You can see them when the light hits the floor. You cannot feel them with your finger. These are the easiest to fix. Medium scratches These marks cut into the finish and lightly touch the wood layer. You can feel them a little when you run your finger across. They need repair kits, touch up markers, or filler sticks. Deep scratches These cuts break through the finish and go into the wood layer. They look darker and may feel rough. Deep scratches often need sanding in a small spot or replacing a plank, since engineered wood has a thin top layer. Knowing the scratch type helps you choose the right method and keeps you from making the damage worse. Quick Ways to Fix Light Scratches on Engineered Wood Floors Light scratches are common and easy to fix. These scratches sit on the top coat. You can use simple items to make them blend into the rest of the floor. Step 1: Clean the area Use a soft cloth with a gentle floor cleaner. This removes dirt so you can see the scratch clearly. Step 2: Use a repair marker Repair markers match wood color well. Draw lightly over the scratch, then wipe the extra marker with a clean cloth. Always test it first on a hidden area. Step 3: Add a polish A safe wood floor polish can help blend everything and reduce the shine difference. Apply a small amount and gently buff the spot. Step 4: Check the results If the scratch still shows, apply a second layer of marker or polish. These small steps work well for most light surface marks. They also help with light scuffs and small rub lines. How to Fix Medium Floor Scratches With Repair Kits Medium scratches go a little deeper, so repair markers alone may not be enough. Here is what works best. Step 1: Clean and dry the area Dirt prevents fillers from sticking well, so start with a clean spot. Step 2: Use a wax or putty filler Most home stores sell repair kits made for engineered wood floors. Pick a filler color that matches your floor. Warm the wax slightly with your hand and press it into the scratch. If using putty, press a small amount into the scratch with a plastic tool. Step 3: Smooth the surface Use a plastic scraper to level the filler. Do not use metal tools because they can create more scratches. Step 4: Color blend the repair A touch up marker can help the filler match the floor tone. Light strokes work best. Step 5: Add a gentle top coat A small amount of finish or polish helps seal the repair. Medium scratches often disappear after these steps, and the surface feels smooth again. How to Fix Deep Scratches on Engineered Wood Floors Deep scratches are the hardest to fix because they cut past the finish and into the wood. Since engineered wood has a thin top layer, heavy sanding could remove too much wood. So you need to use safer methods. Option 1: Spot sanding Light spot sanding can help if the scratch is not too deep. Use very fine sandpaper. Sand gently in the direction of the wood grain. Stop quickly if the color changes too much. Option 2: Use wood filler Deep cuts can be filled with color matching wood filler. Apply it firmly and smooth it out. After it dries, add a touch up marker to match the floor shade. Option 3: Replace the plank If the scratch is very deep or wide, the best fix is replacing the damaged plank. This keeps the floor level and protects the rest of the structure. Because engineered wood uses a click or glue system, replacing one board may need help from someone with experience. Deep scratches look scary, but they can be restored with care and patience. When to Call CV Floor and Blinds in Coachella,

Read More »
Table of Contents